A Bitsy Tutorial
Tutorial Translations
Chinese translation
Japanese translation
What is Bitsy?
Bitsy is a web-based game-making tool on itch.io made by Adam Le Doux, available at https://ledoux.itch.io/bitsy.
It's a tool with an active and growing community, with hundreds of games being made ranging from short personal stories to exploration of intricate fantasy worlds, and everything in between.
It's a tool that people love so much because of its constraints. The limited colour palettes, tiny pixel canvas and simple mechanics allow for very focused ideas and thoughts in the games that people create in it. Every pixel, word, and colour decision has so much weight, and is capable of conveying so much in the absence of other noise. But, an 8x8 pixel grid gives you 1.8446744 x 10¹⁹ possible options for every tile. So how limited is that really?
It's also super easy and satisfying to use, with no need to code anything at all. It's so expressive, and basically every Bitsy game ends up being completely charming by default.
What can I make in Bitsy?
Bitsy is really great for short narrative games, vignette games (personal or otherwise), or tiny adventures. If you need a place to start, maybe think about an event or a place in your life that you'd like to tell a story about, but your options are infinitely broad, go with whatever feels right!
If you need inspiration there are so many excellent Bitsy games on itch.io. Lorenzo Pilia has made a really great list of Bitsy games that is regularly updated. I've also included a list of some of my own favourites at the end of this tutorial.
The game that I made while writing this tutorial is embedded below if you're at a computer, but also on itch.io.
Enough of this introduction, how do I make a Bitsy game?!
I'm glad you asked! First, go to https://ledoux.itch.io/bitsy.
The first thing you'll see is this screen:
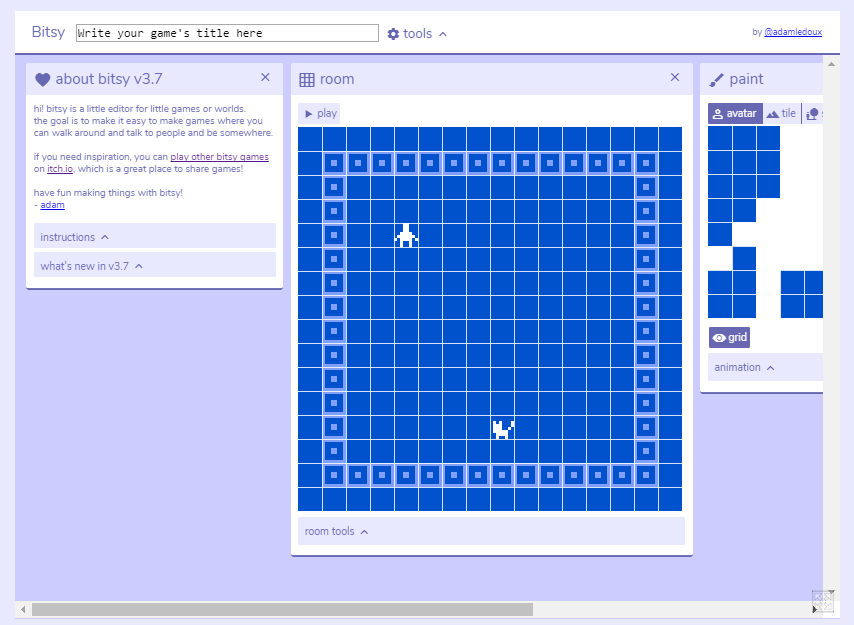
Take a minute to look around the various panels and expand the 'about' section.
At the top of the page is the text 'Write your game's title here'. This will be the opening text in your game, so you might want to change it later once you have a clearer idea of what your game is about. Try changing it to something temporary now though to see how it appears in the game.

There's a 'tools' button next to this, click on this to look at what other options are available.
Next, go back to the 'room' panel and press play, walk around in the game to see how a basic Bitsy game works! Straight away you should see the title that you just entered!
The main elements of the game are:
- An avatar - your playable character. They can walk around with the arrow keys and see what other characters have to say
- Tiles - non-interactive scenery, which can be set as wall-tiles that you can't walk through
- Sprites - interactive scenery and non-player characters that can have dialogue
Press stop to exit play mode and continue editing your game.
Draw some pixels
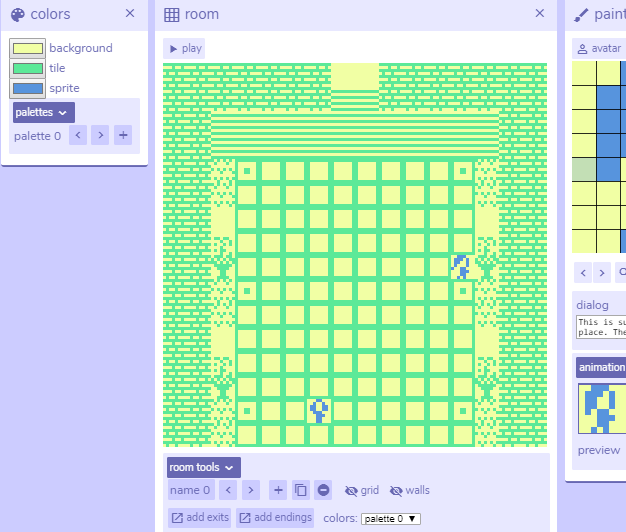
Let's draw some characters! Make sure the 'paint' tool is open - if you can't see it, open the 'tools' menu and make sure it is selected. If you have lots of tool panels open you can rearrange them by dragging them around in the main screen.
With the 'avatar' section of the paint tool, you can edit the default character by clicking each square to toggle it on and off. For my avatar, I have chosen to draw a lifelike and realistic rendition of myself, but feel free to draw whatever you wish, you'll see that it updates the avatar in the 'room' panel automatically. Toggle the grid on and off for pixel guidelines.
Now click on 'animation', and your avatar starts flashing. This is the beginning of your first 2-frame Bitsy animation.
Click on the second frame to edit it, you'll see a transparent overlay of the other frame to act as a guideline to trace over if you like. This can be really useful if you want to just edit a pixel or two for a simple animation. In your 8x8 grid, you get to make some really cool design choices about how to represent your avatar. What are the most important features you want to show? What defines the character? A surprising number of things can be represented with just one or two pixels if they are in the right context. For now though, I'm just going to wave at you, hi!
Let's draw a few more tiles to add to the room.
Click on the 'tiles' tab of the 'paint' panel. Edit the default tile in the same way as you edited your avatar and you'll see that it updates in the room panel automatically.
To make a new tile, click the + symbol under the tile image. You'll be given a blank tile to edit as you please. To switch between the tiles you have made, click the left and right arrows below the image. Now click the magnifying glass and the 'find drawing' panel opens with a gridded list of the tiles.
The tiles in the room work in the same way as editing pixels in a tile - click on a tile to remove it, then click again to place the one that you currently have selected in the 'find drawing' panel.
In the 'paint' tool you can also duplicate and delete tiles, and add animations.
Try making and placing a few different tile types in your room! (Clicking and dragging here can be really useful)
The last button to check out here is the 'walls' button - you can toggle this to make the tile impassable. An important tip is that setting the wall on/off only applies to one room unless you select 'for all rooms' (so if you suddenly find you can walk through walls in your game - that's the first thing to check!).
Try playing your game now and see how it feels to walk around!
Currently, my game is me in an empty room talking to a cat - while I don't hate this idea (honestly, that sounds quite appealing right now), I think I might make some changes for the game I want to make.
To edit a sprite, go to the 'sprite' tab on the 'paint' panel. You can either edit the default cat, or save it and make a new sprite, which will appear in the 'find drawing' panel in the same way as the tiles do. Make a new sprite, and add the text that you would like to appear with it.
Click on the room in the tile you would like to appear in. Something to note is that you can only have one instance of any sprite per room - so if you click somewhere else they will appear in this location instead (this also means that if you want the same sprite in multiple rooms you have to duplicate the sprite and place one copy in one room and one copy in another).
While I'm here, I'm going to change the start location of my avatar by selecting it in the 'find drawing' panel and clicking where I want it in the room. Once you've added your new sprite, play the game again and walk up to it to see your text!
As a tip - if you make a new room and are overwhelmed by the blank space, try making a really simple tile (even just one solid colour) and block out the rough layout of the room, maybe indicating the path the player will walk through or the location of key objects and scenery. Then you can replace the tiles gradually and move them around until it's right (this is also how I do any multi-tile pieces of scenery).
Exits!
If your room is anything like mine, it looks like it needs to lead somewhere else. You could definitely make an entire Bitsy game in one room (see my list at the end for a couple of examples of this), but 'exits' (transitions between rooms) are one of the core elements of Bitsy, and are one of the most interestingly explored parts of the tool in my opinion.
Let's start with something basic though and just allow the player to walk into a new room from the edge of this one.
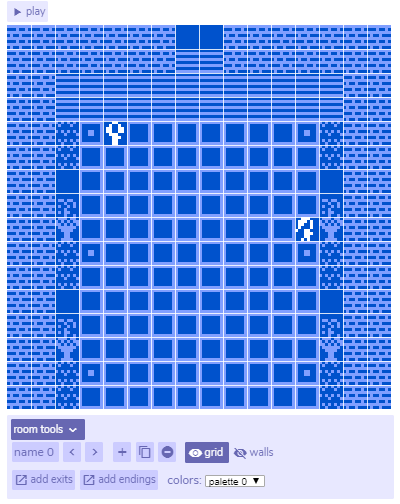
Click on the 'room tools' tab underneath the room. There's a few useful navigation and view tools here which are worth exploring. The 'grid' button toggles the tile grid on and off, which can make it easier to see what's going on in the room. The 'walls' button shows you a mask of all the tiles that are marked as 'wall', which is really handy for quickly checking your collision zones. To make a new room, either use the + button, or the duplicate button next to it if you want to preserve your tile placements. A new room appears and you can now move back and forth between rooms using the arrow buttons.
Let's put an exit in first so you can see how it works - you can change the placement, delete it, or add more later if you want to.
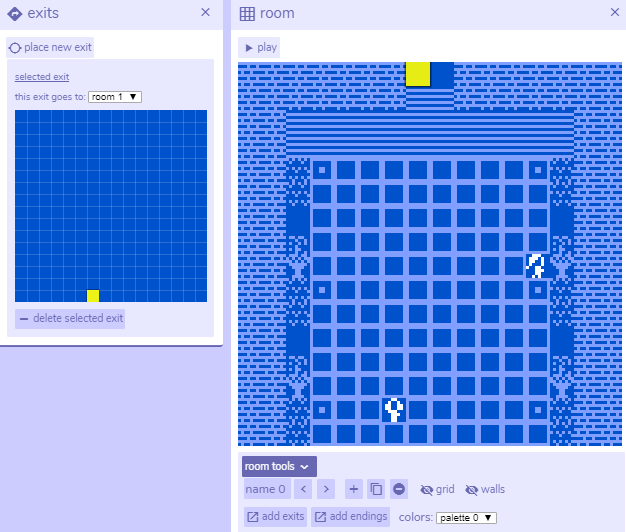
In the tools menu at the top of Bitsy, make sure 'exits' is selected. Navigate back to Room 0, then click 'place new exit' in the 'exits' panel. A mini-view of the room will appear, and a dropdown list of all your rooms. Select the room you want, and then click on the location in the mini-map for the exit destination.
A good way to think of these exits is as teleporters for your avatar. The exits can lead anywhere, even within the same room. As far as I know there is also no limit on the amount of exits you can place. Once you've placed the destination, play the game to see how it works.
To edit an exit, click on its tile in the room panel to select it, and the mini-map will reappear so that you can click on a new location for the destination, or drag it over to the desired tile. You can also delete any exit that you have selected using the 'delete selected exit' button at the bottom of the 'exits' panel. Try placing and editing a few exits until you feel comfortable with the process.
Something to consider when placing exits is how they will affect the player's orientation. They may become disoriented if you lead them out of the right-hand side of the room, only to appear at the top of the next screen - why has the direction of movement suddenly changed? It can be frustrating if you have to search for your own avatar in a room (I certainly had a few rooms in one of my games that did this…). HOWEVER! Maybe this is the effect you want? Is your game about feeling lost and confused? Then maybe that's a great way to emphasise that. Or maybe you don't even want the player to realise they've changed rooms?
There's a LOT of options with exits, and great examples of how they've been used (I'll add some links at the end, because I could talk about this here for a long time).
Also, make sure that it's obvious where your exit actually is (unless that's part of your game), as it can be a frustrating experience to have to search for a way to continue the game.
Oh, also, remember to put exits going back to the previous room unless you want the game to be a one-way system!
Only 3 colours?!
It's probably time to make a few more tiles for your next room, but first I'll go over color palettes so that you know how they work and can be incorporated into your new rooms.
From the tools at the top, make sure 'colors' is selected. You'll see the palette of 3 colours that you can edit, and what they represent in-game. You can either start editing the default palette, or if you want to keep this one, add a new palette by opening the 'palettes' section at the bottom, and edit the new one instead. To see how your new palette looks in the game, select the palette you want from the dropdown list at the bottom of the 'room' panel. You can set one palette per room, so the 3 colour limit isn't quite as strict as it sounds! When you're choosing your colours, think about things like how the scene is lit - are the colours warm or cold? Should there be a lot of contrast? Try keeping the background colour constant and changing the lightness of the tile colour for some cool effects! I'll add some more links at the end with interesting examples of colour use.
If you're stuck you could try a website like http://colorschemedesigner.com/csd-3.5/, where you can play around with colour schemes. You could also take a look at https://twitter.com/colorschemez for some interesting combinations.
The end, almost
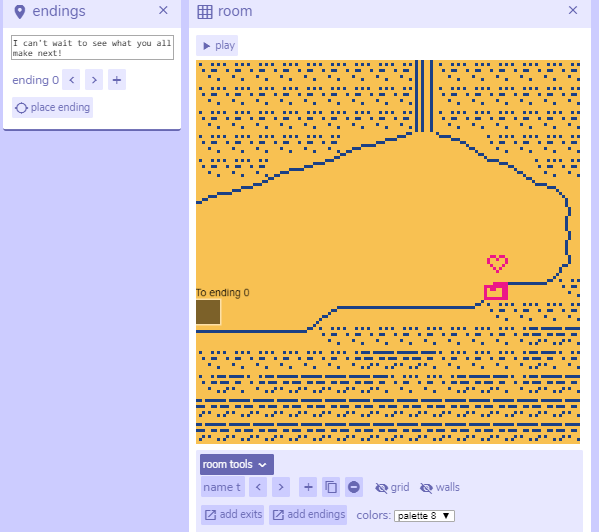
After you've added all the sprites, tiles, rooms and dialogue that you want, you might want a way to end your game (although, really this is optional).
Select the 'endings' tool, type in the text you want for the ending, and then place it in the same way as you would for an exit. You can have as many endings as you want, and place them wherever you want in the game.
Play your game through, and admire your work!
Downloading/Saving your game
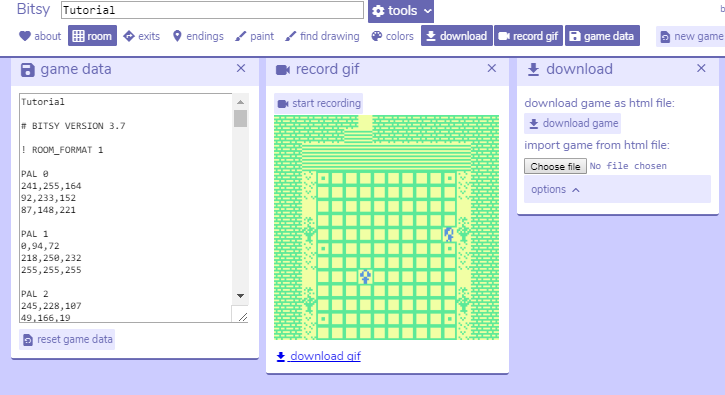
There are a few final tools that I haven't covered yet. The first is the 'record gif' panel, which does exactly what it says. While you are in play mode, press 'start recording', move through the sequence you want to record, then press 'stop recording'. It will only record the time that you are moving, so don't worry about getting the timing perfect. You can then download the gif to do what you like with!
You can also download the html of the game in the 'download' panel, which will allow you to upload it to itch.io (and submit it to the monthly Bitsy jams!).
You can set the background colour and also the size to export the game at (512px works pretty well for most things).
The 'game data' panel gives you the text version of the game itself (I always copy and paste it into a text file before starting a new project, just in case). Have a look through this data if you are interested, you'll be able to see every decision you made here!
I want to make more games!
If you are happy with your game, it's downloaded and saved and you're ready to move on - start a new game with the 'new game' button! If you refresh the page or close your browser, the most recent version of whatever Bitsy game you are working on will be opened. But once you have started a new game it's not an easy process to get the game back unless you've saved out the game data, so make sure you are ready to move on, and when you are, create away!
Game Data for the Tutorial game
I'll pop the game data for the game I made while writing this tutorial here in case anyone wants to just play around with it - it's got a section of interesting room transitions so you can see how that works (although, it actually looks kind of intense as I had to duplicate a LOT of sprites to do it, and there's at least 4 exits per room, but, it can be done! Oh, you'll also notice blocks of ~80 identical sprites, that's for the colour palette rooms - I mean, don't do what I did, find a better way to do something cooler!)
Here's the game data!
The game itself is playable here
Extra Bitsy Tips!!
The wonderful Bitsy community have created a Wiki with tips and hacks for extra fan-made Bitsy features.
I'm ready to explore...
Cool examples of cool games
I'd like to include some examples of Bitsy games that I've particularly enjoyed in the past (today being 7th October 2017, as a disclaimer to all the amazing future-Bitsy games I'm inevitably going to forget to add in to this list at a later date), ones that I've found particularly inspirational when thinking about my own games:
Interesting narrative: https://rhythmlynx.itch.io/wip - an autobiography, and inspiration for my tutorial game https://arcadim.itch.io/local-network - this one goes deep
Amazing room transitions: https://seansleblanc.itch.io/rain - transitions can be time as well as space https://saranomy.itch.io/ihadb - it looks so simple until you remember how it's made
Interesting avatars: https://cephalopodunk.itch.io/silence-would-be-better - you are a radio https://seansleblanc.itch.io/i-wonder - listen to people's thoughts https://acgodliman.itch.io/tomb-raider - discover archaeology
Perspectives: https://jctwood.itch.io/thirdcrypt - first-person https://night-driver.itch.io/day-in-the-life - side-scroller https://rarelikeaunicorn.itch.io/penroses isometric
Use of other game genres: https://tencow.itch.io/metrodungeon - has an interesting battle mechanic https://joshavanier.itch.io/porte - a cool puzzle game! https://ebeth.itch.io/slow-growing - a farming sim!
Use of audio! This still amazes me...: https://triage.itch.io/waking-up-while-the-sun-sets - beautiful soundtrack https://candle.itch.io/no-destination - ambient sound effects
Beautiful art: https://itch.io/g/samkeeper/moth https://supiket.itch.io/tusanhomichi https://hyperstructure.itch.io/a-secret-bitsy-jam
Experiments with Bitsy: https://jctwood.itch.io/tunnel - double Bitsy!
'One Room' games: https://seansleblanc.itch.io/running-late https://cephalopodunk.itch.io/zen-garden-portland
And if you're interested, you can find my games at https://claire1605.itch.io/
You can also find me at https://twitter.com/shimmerwitch
Also thank you Mark for helping me edit this and adding some great advice!
And obviously thank you Adam for making Bitsy and the whole amazing community that surrounds it!!